วันจันทร์ที่ 31 ธันวาคม พ.ศ. 2555

Coloring techniques from outside the frame


Today we come to practice painting together. I do not make it out of the frame. The device can be used to draw a sample to see this.

1.  We will use color posters. I have a color or acrylic. Or  water color used interchangeably.

2.  Paintbrush round about number 4 and number 8.

3.  Palette


4.  Water tank for washing Paintbrush

5.  Paper 100 pounds

6.  Wiping cloths, Paintbrush or tissues.


Get started now. Why many people paint it out frame


1 . color mix  with water. Water less or more. If the paint is going to be difficult. Friction color does not stick to it. If the water color is rich and the spreading out of the frame.

2.  mindfulness meditation is good for stability. But do not make a mess, mainly because it will mess up your hand to me.

3.  Impatient
4.  Hand weights Press Paintbrush Too strong

5.  I know why we try to figure out if this is or is not absorbed in practice.


From the training

1. Drafting pencil with a gentle grade
2. The straight Paintbrush to approximately 90 degrees is not difficult to control.
3. cut line the outer frame first
4. A number larger Paintbrush. Drainage areas in My colors. Waiting for the desiccant into the second round.
5. Completed. The edge coloring is also not good. Detailed one.


We have applied to many other applications such as My painting model plaster a sign doll.


Acrylic painting for "home"


Today I practice drawing buildings. Model selected from a much wider area. Actually, there are a lot of beautiful drawing. But the details are too crowded. The torture started training to become a new drawing.

Drawing buildings using perspective to help in the form of a. Of course, the people who work but do not have a design architect for his drawing tools. And accuracy to be used in the cable. Our free-hand sketch. Do not use a ruler. Overview as to not warp too.


This is a close-up perspective of the objects as they are seen as a three-dimensional aspect outs.

The eye level (Horizontal Line)'s initials HL.
A skyline point vp. Following to say. I will be on the line.

Focus sight (Vanishing Point) or confluence or the hypochondriac image abbreviated as vp of looking at an object may have a point as any one point or two points, or more, since the first picture we draw may have multiple objects. piece Each piece has a different view.

Master paintings


The body shape do.
Model to focus the eye on the other two, it's a snapshot of the position, as usual.

Once the photo is then used to cut the brown acrylic paint.

Paint the sky blue + white too. Except the part where the clouds are. Then I used white for the clouds.

Then paint the parts coming down from the mountain behind the house and the front pasture.

Asked the other parts before painting or not. I replied. First time coloring at home. We have also made ​​clear later. No it is not. Because the effects of the painting. No better way. But the sky before I paint because it is the dominant form in many private The cover can be easily seen that for myself. The best way is to do it.


Do not forget that the main draw is


- An overview before drilling out the details.
- Take a picture first and then return to the picture detail.
- Paint the whole picture first and then return to the profile.
- Where it is sometimes not correct. I see the rest of the picture before. How to edit or add to the possibility again.

At this point, I return to the store at the sky again.

The last detail. Back to work as far as I can see or not. I look around.


I know this is a little drawing. I forgot it. It crossed the finish but overall it is the most similar to the past. Open it. Whether dithered color combinations for the eyes only see shadows. The main focus for me is to paint buildings. The more you practice the more painting, more diverse and more complex.

When drawing this (late) color distortion so I shot it. As to the color. Tell it again. Mix just close enough. Do not stress. If you are happy with the mix of colors as possible.
Practice, however, it is not.

A white acrylic paint, then it is not. Wait for it to dry and then paint over it.


วันอาทิตย์ที่ 30 ธันวาคม พ.ศ. 2555

Acrylic painting roses


Sample

The first paint  burnt sienna + yellow ochre + white paint down to the first floor. I mix a lot of waiting for the paint to dry a little smoother as well.

The first coat is dry. Paint the second color. This drain faster.

The spread of light on the left side. On the right. The first layer is dry, use white paint to it. Then spread smooth. This way you do it before the paint is dry. Includes the estimated weight of the prototype was close. Will run faster. Saturates colors more harmonious. Then wait for it to dry. At this stage, I try to end Phu ward. Spread much more easily.

sketch a picture with the layout of the picture first. Approximate position of the flower stalk will not have to remove it. Then gradually add more detail. Together until the end.


Color drawing a line.

Red flower painting. The foundation.
And the use of green + brown. A dark green.
A green + yellow ochre green light. I was younger than the white.
Or green + yellow + white.

Red-brown color. The shadow of the flowers. To darken the shadows. Use red + purple

Zoom leaf coloring and other details on the details later.

Objects are close together on the color. Will reflect the color of the object to each other. The green to red insert.

Overview of the picture. Remaining details. I noticed it gradually slow stalking.


After the painting was finished. To the overview again. It is hard to see. I try to make the color of the leaves fade to the background color. A range of leaves. And I inherited a shadow to the ground.


Completed


Observed when writing a complicated nature. Regardless of the source and the possibility of sounding like a blur, I see a clear pattern. We can customize them. With regard to the origin of the leaves have come out with a folded shaft. This can be referenced by the view of the real as well.


Dok Bua Tong


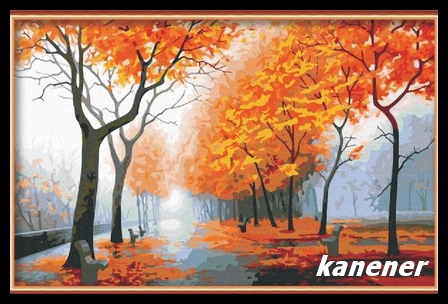
Painting Acrylic Dok Bua Tong 


The second piece is my step by step for this task more difficult than ever. Especially in front of the flowers.

I painted this in size 30x40 cm., Such as the colors used are the galleria, rowney, josanja, artcreation.

That was during the trial, each brand would be yes. It took me some color as primer. Which color is better, it is not the end.

1. The body image. It is centered vertically. The landscape before me. The position more easily.
- Then start dividing line of each mountain. A large group. I do not have the details. Flowers in front of a group. The structure is included as well. I did not paint the car because I have a natural emotion.

- Then on the picture to enter the details here. The way the body is not always the case. Individual to practice the skill. I find that we do not. Do not be so serious that it was only me. But for me, it is the main form, then the details together.

-  I like my body-colored wood. I finished the outline I used acrylic paint on blue. A simple mixture of water. I cut all the parts. Can be seen clearly.

2.  Started painting the sky before (because it's a great color cover zone. But one can draw from the first page I was) I cerureane blue + violet + white mixed into the first two slots are white. The white box less. What is the dark and light zones of the sky.
- The cloud. I omitted it.


3.  Mixed white and more. I painted the clouds. I will not detail it. To be the first to see the dimensions.
- Use cerureane blue + violet + white slightly. Paint a mountain range.
- Less is more mixture. What in the mountains near the other. And drainage at the past. The paint is water-friendly. Then you can get into the crevices of the canvas colors more easily.
- Do not forget to light in one eye (see the step by step acrylic paint on the sea).

4.  I made ​​to the mountain front. I look and feel as the original full details. I used to be blue, phthalo blue + burnt sienna but put a little water. The dark color of the painting to make it easier to see the overall picture (this one is not for me).

5.  A green phthalo green + yellow ochre Coloring Page yellow ochre the mountain, more by reducing or increasing the intensity of the color switch on the water. Some thick paint. Some light relief.

6. Paint the green mixed with the sample 5.
The flowers are followed by yellow ochre the shadows. And yellow are in the right light.
I painted a gray ground Road.


7. We finished put a foundation on face
. put a foundation on face will give us an overview of the color and weight of the images easier. If we mix the colors as close to the original color. The second round we will store it much easier.
- From the profile of the cloud. Dried using the same color. (See the step by step acrylic paint on the sea), using blue, purple + white too. The paint dry first. Then repeated until the desired color. add white + white, orange, yellow is the color of light.

- The term of the mountain next to the blue + white and purple. Find it. Which is the brightest. Coloring page from time to time. Add it to the green. The principle would be the term. Take a look at my picture. Back to overview 3-4 draw at the same pace, do not make an effort.

- The way it is used regularly. I will draw a picture we're drawing in over two and a mirror. We will see that we are back on the drawing. This will give us a unique view of the images. We see that the error is small and the point where you break more easily blurred my vision. We are not normal, probably because we used to see. With image we draw from the start, so I do not see the downside.

8. Detailed in the following. Must master it (if you like) green on the mountains are the details for a touch of phthalo green + white light. Some are blue, purple + white.
The following is a mountain back roads are of little yellow ochre + white paint, especially at the top is very light. This will be very bright.


9.  Mountains green on the right. Detail using phthalo green + yellow ochre + white parts.
-  Field of flowers in front of all road users in the yellow ochre + white light.

10. Flowers foreground. Just close your eyes to the light. I took it to a dark green to a whole new level. To give more dimension. The more weight that much. And a further dimension to the visual appeal. In particular, it should focus on the object in front of it.
- Detailed steps. I used to intensity and color. The addition of a little water. I do not.

11. Use Soft green . Written appearance of the leaves. This is the hard part for me. To look at the flowers. And the weight of some heavy brush, press it lightly. Some overlapping leaves some big some small.
To cause tempo of leaves that are not too rigid. Paint on paper before you begin to practice true.

12. The coloring leaves. I need to do the lotus flower in the yellow ochre paint in the shadows. Pollination of flowers is also detailed here.
- Only yellow. The light was focused on the flowers. And just like the flower leaves, with a small flower. Flowers in groups overlap to see that yellow is the color of the light and thin. One can not paint with a dark drown. We'll paint the rest of it will come around.

13. Detailed flowers ahead by more attention to the lighting in the picture I used yellow ochre + burnt sienna, but I beat the dark too. Now we come to again.

14.  Edited by too deep a yellow ochre rounded down to it, the yellow down. I painted it over again to bright colors over it. I was featured. I repeat it again for 2 rounds on both light and shadow.

- In this section you have to complete the whole picture. I knew from the start that the amount of detail. I was not satisfied with it. But it is not always correct. I want to see first snapshots. Can not be solved repeatedly.

15. In this section is now complete.
- I go back from the clouds. I paint to give it more light.
- The mountains, the colors are dull. Purple and more. I used blue Padๆ down.
- Mountain road after a little light zone. I will have more details.
- Composed of the road much clearer.
- The green mountains on the right. Add to Violet Blue. It has the atmosphere of the big picture.
- The front street. Add light zone as well.
- Flower Front groups big yellow flower color is white again. And do not forget to add lavender flowers to the group page. What color is harmonious overall picture.


Abstract

- The techniques used to make the blend remains the same dry brush method. This is an easy one to take it any other way. I feel that this kind.
- I noticed that the paint surface is dark and chose the mostly drained weight. Light weight with me.
If we paint the weights that I was very close. The amount of detail we added just the right light. I finish more quickly.
- If you want a bright color. I dithered back and forth too.
- If you want to focus on the light. Too much water, then I will Colour of four conifers. Must be new. The colors are very intense.


This is the only way to close your eyes to light (see the step by step acrylic paint on the sea).

Picture 1. Was not original.
Figure 2. Eyes look the same light as I can see.
Picture 3. Trying to determine the weight and color into the space. And still do not have any details.

Feedback or comments that are useful to have it published


วันเสาร์ที่ 29 ธันวาคม พ.ศ. 2555

art painting


 The oil painting Virtual people

1. An oil painting on canvas size 30x40 cm. Both this hair color. It with light purple. Then wait for it to dry for about one day of work may be taken from some discolouration.
This is quite urgent. The first four sites. This figure is down. I usually do not draft a sketch straight on to the canvas. I draw on paper first. Then copied to the canvas again. I do not like to see the body. Dirt before painting (this is my personal preference. But if one were to sketch directly onto your canvas. Recommend the use of wood in the form it would take a blue, red or whatever color. Choose a color as close to the whole picture. Do not use pencil. I painted it on. Oil from oil to dissolve the dirt pencil sketch I had to come to work later) draft finished. I used acrylic paint on. Pale brown water all vessels. Our purpose is to oil. This is a solid color. Color to remove the body until it is not visible. I use acrylic paint on. The drying process will start following it. But I would not use any oil. I cut out just enough to be easily seen. But not too dark or out. So the actual color. May be overwritten several times.


2. I mix colors using shades of yellow. Before looking into the shadows, leaving that part of the light is too dark a color is mixed with linseed oil, but this works for now. I used the oil mixture to dry faster. It will tell me how to use it.

3. I really do not remember the color. The mix progresses. Sorry excuse for a new page. The tone is light or dark before, but this one is one of my skills. But the tone is because I do not clean Phu. The colors are not distorted. One can feel the ground before or after the face. Your clothes before. I like the color. But the key is to keep out light.

4. Along with dark shades on my face.


5. Along with hair and clothing down to the other before it. The tone and the weight to be detailed. In the past I used to Phu it all about the numbers 8-10 down flat.

6. Blend colors on this important step. This could be good or bad thing. I need to stop and recognize the dithered. When we see that to be available. Not smooth so the paint will be mixed together until thick and rot

7. mix color and well done. We will then see that tone the body. Now, to add color, or to reduce it where it is now. I added a green tint to it anchors the tone of the face.

8. Mix with my oil paint drying process begins and then it starts to dry. Eyes, ears, nose, mouth, my profile, but I do not use. Would have to wait awhile to dry or damp, then add To see if it can keep the details yet. For example, we want to increase the brightness of the face, but when added to it. Color space to dry and mix with a new color that we rely on. Makes no difference to the outcome or the like. I should wait before it. I will not waste my time. May be first Should be Standard Color before. Also detailed in the section before it.

9. Less detailed so I now have to cool it. Color is a matter of individual taste preferences. It takes time, trial and error. Into finished parts that with my background. We base with light purple in the first step. It would be easier to paint. Do not worry if you see a white canvas emerged.

10. I see it. I have done the spray coating has dried on. Help to live the same color. And it last longer.


Art


Watercolor painting using debar marking


Today, let's draw the marking.

We see that it must have been debar?

1). Watercolor is transparent. Many people believe that drawing a clear view to the nature of some of the properties of color. Thus marking the milestone with a drawing. Small branches, small pole. And many other works easier.

2). Work much easier. But it's time to paint marking.

Illustration


1. When we finished, we had a draft marking paint brush dipped into a soap or shampoo, then dipped marking Sun Male pick apart a little at me. Not every part of the image. Then dried for about 15 minutes.

2. The following steps are the same steps that I feel as if I did not do this. I do not go to the next step. The water began to paint on the paper plate to the second round to thoroughly wet the paper. Paint the sky and the trees in the back first. The color of the object. It will mess up the outside does not matter. Easier to see that we are working on the marking.

3. I deal with a dry finish and trees behind the house with wet on dry techniques.  try to go see the old tricks I see.

pictures Coloring


4. From coloring to coconut clearly if we do not keep the color. We do not have any coconut leaves light natural-looking images.

5. When we add the leaves to the back of the finger, then rub off the green marking paint coating the diluted water. Enamel paint is a light thing to the ground as little as possible.

6. I return to the ground. Most of them are truncated.

7. Detailed parts and so on. I feel that drawing from the back to front order and can not estimate the weight easier and it certainly has been drawing a lot of it has to go back. Of this is to try it. If Moore can not develop very slowly.

8. Put some water into the picture is to bright.


I'm done. I have very deep. The process is similar in many past.


วันศุกร์ที่ 28 ธันวาคม พ.ศ. 2555

Dog drawing


Painting color Water Dog


1. The first is to use a pencil colour to sketch the purple (the colors are the colors that I have. Do not make it too obvious. Too weak or do not see).

Although its fur is fluffy. But we will try to muscle structure. And bones to meet it. The time frame otherwise distorted.

2. Draft finished. Back view of the robot and our dog. That is available or not. It will become a disability. Check before .


3. Wet on wet method is used. We challenge the water first. (I emphasize that water. Glass is opaque and not washed. Now I'm dirty) oil soaked into the second round on. The paper will absorb fully. We will not have time to deal with it on my dog. The total weight before. Weight, then darker. This way we have a good guess. I'm responsible for the end to it. We almost forgot to glue the rubber Straight shag. around before. Hair streaming to see the colors used on the page I have three colors Ultramarine + violet with Burnt sienna finish to win the header but gradually weaken.


4. Along with the two front legs.

5. The next step is to make the ears.
Paint with water on it. This is done by ear. I do not dry it with a single. The dog's finish head.

6. daub With water on the left side of the body first half. The color is light weight. This is not to focus on it because it is very remote. Post it on the front foot. Then followed by the right hemisphere.


7. Wait a moment when the paper is dry, we will apply Glue in the first step out the first step paint peeling off enough to see the white stand out clearly a thin brown paint. This was not unique.

8. The first floor is finally back. But I certainly do not want the image above into the shadows.


Tulip painting


Tulip Watercolor painting


Using this technique, we will apply the adhesive masking film which is the color that we want to leave the white of the paper. Used in our work. The glue that smells like a used rubber, casting it. Only our water smell stronger than rubber.

This prototype

1. Position overview of all elements and details

2. Draft finished. To see that a group of tulips. If you want to be painted white except the flowers are difficult to match with the turbine we use to paint the desired masking film. Glass shaft, then take a dip or in other ways. Glass for soap or shampoo to dip at first. Then dip the masking film.

But I try to use latex paint look. Never tried it.
Wait for the paint dry.

3. Mostly wet on wet painting technique. Apply water to go. I do not see the rhythm of the water too wet. Do not get too wet to paint or not.


4. The orange and blue, ultramarine blue mixed with purple.

5. Using Tissue Paper from the lining in the cloud that you want to do.

6. Drawing a tree on the back. We want the tree after it is painted like the sky is dry. Do not forget the green + yellow ochre with blue inserts. It has the atmosphere.

7. Down water's at the all tulips 


8. down green, medium green to dark green with purple. Yellow orange. Spread to different parts of the four runs.
At this point, I have not thrown it on the sky.

How to paint or draw a picture. But it is a technique.


9. I color my flowers dried. Go back to the first wind turbine used on dry, wet it.

10. I took the rubber out. It is tough, but it works quite well. Gently remove the rubber off the paper carefully. At times it seemed a little paint first. It's a bit sticky. I kept that long?


Remove rubber successfully.

11. I keep all the details. For example, a group of tulips. Fill light gray, yellow, orange, purple flowers. Green leaves, some finished over a sloppy job.

Several months. This painting still haunts me every day.


It remains in my heart. I try to draw it once. Into this.
But it was not as pleasant as possible. This is now.


วันพฤหัสบดีที่ 27 ธันวาคม พ.ศ. 2555

pencil drawing


painting pencil drawing 2


Painting wood

The first step of painting. Structure is that we must pay attention first. Is not accounted for. I care a lot about body image. If the images do not come out the same or distortion. Paint is not pretty.

I use a different format. The textures and shapes. To draw a more diverse training.

1. The first step for the positioning of each piece before. Without attention to detail. We may represent a ring of rectangular or oval step is to place a sheet of paper with the image. Size estimates of individual objects as close together.


2. The term of the form as well. This is important to tell the distance of individual objects.

3. Following is the complete details of the individual objects. If you object oblique. The horizontal and vertical lines to make the main draw. Calculate the tilt angle allows easier.

Light began to shine.

If the drainage layer too. Not to the override. May be estimated to be in the early stages. The next will be better.


4. Start to paint objects. As you see, can work together to make it easier to visualize.

Direction of the line. Could tell the mood of the image. But for the novice. The attention of many dimensions of light and shadow.

5. The detail of the second round. Add dimension and the pencil harder. Many drainage. In the same area. What should an overlap between colors. The blend.


Looking with one eye shadows. To allow the weight curves.

The first image is the original image.
The second is to look with one eye on this.
This is the third of the weight. Match the intensity of any light.

Detailed final.


comment

If a different color. Placed close to each other.
 A reflection of the object to the side like a lemon yellow to green peppers. 
Would interfere with the color of lemon green little.

These are the pictures we paint. Always the same.

The figures just do not pay attention to the structure and impatient. 
I recently painted, but the painting is to paint it. The training. 
Trial and error until it works the way I do best.